You are here
Creating Capture Files
Contents
Capture Files - An Overview
The Capture File is the file produced directly by the initial scan (or camera shot) of an object. If the digitization operation is properly performed, only minor adjustments to the Capture File should be necessary to ensure that it accurately represents the original object. These minor adjustments should only be done in order to correct any inadequacies in the digitization process. Since the Capture File will serve as the long-term archival copy, it is essential that it be of the highest quality and accuracy.
Creating the Capture File
-
Required: The Capture File should capture every significant detail of the original object. To accomplish this, special attention needs to paid to several software settings: spatial resolution, bit-depth, color space, and tonal range. The appropriate setting is determined by a consideration of the object's visual and physical characteristics and its size.
Setting for Various Material Types
1. Photographs (Profile name: 600-24-RGB-TIFF)
Includes: photographs, postcards, as well as manuscript (hand-written) materials.
Printed photographs vary widely in size, amount of detail, color, and quality, but a rule of thumb is to digitize them with the size setting at 100% of the original and at a resolution of at least 600 ppi (scanner), 24-bit color, to ensure that a high level of detail is captured. The goal is to achieve as close to 4,000 pixels along the longest dimension. Small photographs might need to be scanned at a resolution higher than 600 ppi and at a scale greater than 100% in order to ensure capturing the details that are often rendered too small to see clearly in small objects. If using a digital camera, shoot with the same goal of nearing 4,000 pixels along the longest dimension.
Capture Settings:
- Resolution: 600 dpi (varies by size of the original)
- Bit depth: 24-bit channel (48 bit) (color)
- Color space: Adobe RGB 1988 (because it has a wide-gamut)
- Scale: 100% (retains size of the original)
Capture Actions:
- If color correctness is of paramount importance, include a standard color reference strip in the scanned image. Otherwise, periodic monitor calibration, precise scanning procedures, and environmental conditions (low ambient light) can provide adequate quality control of color.
- Shape histogram dark and white
- Save As format: TIFF
- Compression: none
- Include ICC color profile
2. Printed Text (Profile name: 300-8-GRA-TIFF)
Includes: books, pamphlets, lables, etc.
Printed and typed text documents are usually considered to have a small amount of detail and need not be digitized at a resolution higher than 400 ppi. However, handwritten letters or illuminated manuscripts usually require higher specifications in order to capture the finer details that often typify them.
Capture Settings:
- Resolution: 300-400 dpi (300 is adequate for OCRing)
- Bit depth: 8-bit
- Color space: grayscale
- Scale:100%
Post-capture Actions
Depends on needs. If to be OCR'd, the file may benefit from being subjected to contrast enhancement techniques that enhance the character formation and forces a white background.
2b. Newsprint (Profile name: ?)
Includes: newspapers and other half-tone printing
Capture Settings:
- Resolution: ?-? dpi (? is adequate for OCRing)
- Bit depth: ?-bit
- Color space: ?
- Scale:100%
4. Line-art (Profile name: 200-8-GRA-TIFF)
Includes: diagrams and line-based maps
- Bit depth: 8-bit
- Color space: grayscale (Adobe RGB 1998, if color)
- 200 dpi (higher if smallest detail/print is very tiny)
- Scale: 100% if possible
5. Audio Files [outside scope for now]
- Resource: Audio Advice (JISC) - http://www.jiscdigitalmedia.ac.uk/guide/uncompressed-audio-file-formats
6. Video Files [outside scope for now]
- Resource: Advice on Moving Images (JISC) - http://www.jiscdigitalmedia.ac.uk/movingimages/
7. Proprietary File Formats
Avoid using proprietary file formats as much as possible. Proprietary format may prove to be hard to preserve in the future if the formats details are still protected and not fully understood. If your project requires the use of a propriety format, and this is often the case in print publication projects and delivering audio and video for Web use, talk with the Digital Collections Administrator about how to provide a copy in a more preservation-friendly format. If you must use a proprietary format, try to use the most common one possible, such as a Microsoft Word document. These files may need to be reformatted to ensure continued usability.
- .doc, .docx, .ind ==> RDF, ODF, TXT, or PDF/A (or even JPEG2000)
- xls ==> txt, xml, or PDF/A (or even JPEG2000)
8. Oversize Materials
Materials larger than 8 x 10 in. may not fit on your scanner and may need to be scanned in sections at (600 ppi), stitched together, and saved as a single TIFF file. Or use a digital camera to shoot it all at once. If your computer does not have adequate memory to handle multiple large files at once, try scanning at a lower resolution or compressing the parts to JPEG2000 before stitching them together.
9. Transparency Materials
Slides and negatives are often intended to be enlarged and should be scanned accordingly. 35 mm slides and negatives should be scanned at 100% of the original size and at 2700 ppi or higher. Slides and negatives larger than 35 mm may be very detailed and thus should be scanned so as to achieve about 6000 pixels along the longest side.
| Original Dimensions (in inches) |
Min. Scanning Resolution (in ppi)[1] |
Bit Depth (in bits) |
Digital Dimensions (in pixels) |
Digital File Size (in MB) |
|---|---|---|---|---|
| 8 x 10[2] | 600 | 24/16[3] | 4800 x 6000 | 28.8 |
| 5 x 7 | 600 | 24/16 | 3000 x 4200 | 12.6 |
| 4 x 6 | 600 | 24/16 | 3200 x 4800 | 15.3 |
| 4 x 5 | 800 | 24/16 | 3200 x 4000 | 12.8 |
| 3.5 x 5 | 800 | 24/16 | 2800 x 4000 | 11.2 |
| 2 x 3 | 1400 | 24/16 | 2800 x 4200 | ~11.5 |
| 1.5 x 1 | 4000 | 24/16 | 6000 x 4000 | 24 |
Some figures for this chart were generated by http://tiporama.com/tools/pixels_inches.html.
[1] The scanning resolution for printed textual materials rarely needs to exceed 400 ppi.
[2] Items larger than 8 x 10 are often shot with a camera, but the number of pixels on the longer side should always be more than 6000.
[3] The bit depth of 24 is 65,535 colors and 8.8.8 Bits Per Sample.
Chart 1 Column Definitions
Original Dimensions
This is the measurement in inches of the original object. Do not include the frame, mounting (or the color calibration target if one is used) in the measurement. Measure just the content, but capture the entire medium that holds it.
Minimum Scanning Resolution
The digital resolution should be high enough that when the image is viewed at 100%, the smallest text in the image can be read and the smallest significant detail in a photograph can be seen. The ppi setting will vary according to the size of the original material (see "Original Dimensions" in Chart 1), but no pictorial material should be scanned at less that 600 ppi if it is to serve as a long-term Archival Master File. You may increase the resolution from the recommended minimum if the original contains unusually small significant details or if the object itself is unusually small. However, printed text and simple graphics usually do not need to be scanned at more than 400 dpi - even if very small.
Bit Depth
All pictorial materials and manuscripts should be captured at 24-bit RGB color (Adobe RGB 1998) -- even if just black and white. Black and white typed or printed text documents should be captured at 8-bit grayscale (or 24-bit color if the paper color is to be preserved). Very sharp printed text may be converted to 1-bit bitonal at a later stage for efficiency of delivery, but should not be captured that way.
Digital Dimensions
The number of pixels on the long side of an image is a good indication of how much detail has been captured. If the number of pixels on the long side of the Capture Filedoes is not close to or greater than 4,000, capture the item again.
Digital File Size
The size, in megabytes (=megapixels), of the file that would be generated by scanning an object of this size at this resolution and bit depth.
Color Considerations
-
Avoid allowing sunlight to fall directly anywhere in your viewing area and keep your equipment calibrated. If color correctness is of paramount importance, scan a color reference strip alongside the object. Do not attempt to do any color correction in Photoshop after the scan unless your viewing environment is good, your display device has been calibrated recently, and you know how to make use of grayscale and color reference strips. This document does not cover how to use such reference strips.
-
Capture files should always include the ICC (International Color Consortium) color profile of the input equipment used to create the image (i.e., the flatbed scanner or the digital camera). The ICC color profile is written by the scanning software into the EXIF metadata area of the file header and is designed to help represent color consistently across devices and platforms. Photoshop's Color Management should be set to "always preserve embedded profiles," and you should ensure that the "Ask when opening" box is checked whenever a file is opened. Never allow a program to delete or ignore an embedded color profile or any other metadata for that matter. Whenever you are notified by software that a profile "mismatch" has occurred, you should always choose to preserve the embedded profile. (See <http://www.color.org/icc_specs2.xalter> or "Color Management" and "ICC Profile" on Wikipedia)
Steps for Creating the Capture File
-
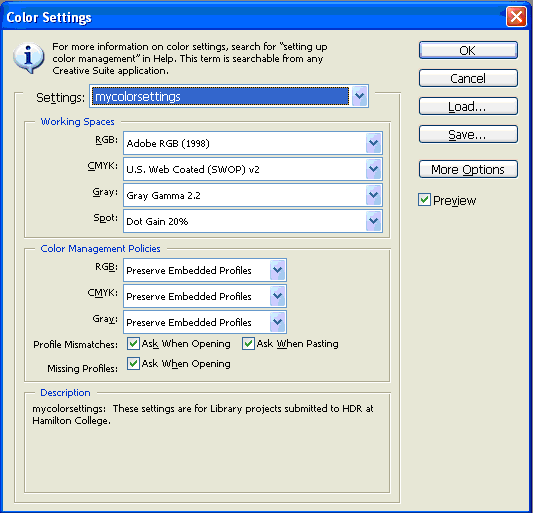
Before doing any scanning, ensure that the Color Settings (Edit > Color Settings) are set properly.
-
Fill in the settings as shown in the figure below and save your settings under a name if your choice.
-
Perform pre-scanning activities:
-
Ensure that every object to be scanned has a unique identifier label. You will need this identifier when you have to give the image file a name.
-
Create appropriate folders on the file system where you will save your scans.
-
Establish a file naming scheme from the principles recommended in "File Naming."
-
- Turn ON the scanner if it is off.
-
Launch the scanning software.
-
Clear the scanner bed (the glass) of any dust or debris.
-
Provide a neutral gray background to put behind the object being scanned. If you are going to scan outside the edges of the object, the scanner's pure white background could skew the tonal range. The gray background can prevent this skewing.
TIP: If there is the possibility of any bleedthrough from the content on the reverse side of the material (common in manuscripts) , use a black backing. -
Position the material to be captured on the scanner's glass bed.
-
Optional: Place a reference strip (Kodak Q-13 card) and perhaps a ruler on the scanner bed along one side of the material to be scanned -- usually the shortest side. For more on this see the Appendix to this page.
-
- Before capturing, set the resolution to the appropriate value. If in doubt, use 600 ppi, 24-bit color (see the Chart 1 above, "Scanning Specifications for Archival Masters File").
- If using a scanner, do a prescan.
Pre-capture Adjustments
Goal: To ensure that the Capture File image is true to the original material -- including its blemishes, blotches, and tears.
- Frame the image (including any reference strip) using the Rectangular Marquee Tool, leaving about 1/4 inch around the border of the scanned object to ensure the whole object gets captured and to allow for some image straightening later if necessary.
-
Launch the histogram tool and adjust levels.
-
Never use the "Auto" adjust button to adjust the histogram pointers as this may clip off some of the whitest or any darkest pixels. Ideally the blackest black pixels should begin to register on the histogram at around pixel value 5 and the whitest white pixels should not exceed pixel value 251. To accomplish this, just slide the left and right end points (black and white pointers) on the histogram to the end points of the histogram curve (5 and 251). Ensure that all of the pixels in the image occur between the two end points you select. Do not make midtones too dark. This hides details.
-
Select "RGB" as the channel.
-
Change the output values to 0 and 255.
- Capture/scan the object.
Post-capture Adjustments
---------------
[merge with what follows]
Post-Capture Actions (image enhancements)
- Straighten image if skewed (rescanning would be preferable)
- Crop closer to edge of photograph if necessary, but always leave a narrow border around the edge of the photograph.
- Do not modify the image after scanning beyond straightening, and cropping. Do not attempt to sharpen the image at this point.
- Add embedded metadata in the file. Tools that can add embedded metadata are Adobe Photoshop itself, but also Adobe Bridge and others.
- IPTC fields to use: Title, Creator, Publisher, Date and find a place for Original itemID/Location, core filename (see below).
- XMP field: rights statement
- Do not perform any post capture actions that might remove any embedded metadata such as the ICC profiles or IPTC or XMP information. Be aware that transcoding to some file formats will strip the metadata without warning.
-------------
- If you use batch processing for your scanning, be sure to do a quality check on a representative sampling of each batch. Work performed by non-professional staff should be checked carefully not only for image quality control, but also for properly following all guidelines, such as file naming, compression settings, etc.
- Optional: If using a reference target: Open the image in Photoshop and use the Info palette (File > File Info > Advanced (tab)) to check the R, G, and B levels in the final image. If they appear to have drastically changed from the earlier sampling a problem may exist with the calibration settings of the scanner. Contact the project manager to notify them of the problem and determine how to proceed.
- Rotate and de-skew the image if necessary to restore the original orientation and straight appearance.
- Do not do any noise reduction, color correction (other than removing a color mask), sharpen, resize, convert format, or attempt to retouch blemishes or scratches on the Capture Master File. These should only be performed on a Working Master File or a Delivery File.
- Check the quality of the image.
- Magnify the image to 100%
- Ensure that the entire object was captured.
- Ensure that all significant details are visible.
- Ensure that all text is legible -- especially the tiniest text.
- Image shows no digital artifacts (such as streaks across picture or dust particles)
- Image shows no excessive noise from the scanning process (Noise is most visible in broad areas of tonality such as the sky in a photograph or the page background of a manuscript document. Black areas show up noise well.)
- Image shows no Moiré patterns (wavy lines or swirls) when viewed at 100% (typical of newsprint).
- Image has no distorted details
- Image has no halos around details -- most clearly seen around text.
- Image has no blurry details that were not blurry in the original
- Image has correctly balanced colors (if color correctness is important)
- If any problems with details are identified, re-capture it at a higher resolution.
- Check the size of the image (Image > Image Size).
- Ensure that the Document Size (print size) is the same as the original material scanned.
- Ensure that the number of pixels on the longest side of the image is close to 4000 (oversize materials and slides have other requirements).
- If any problems with the sizes are identified, re-capture it with settings adjusted accordingly.
- Do not change any other setting in the Image Size menu.
- Save the image (File > Save As)
- Save the image into the appropriate folder.
- File Name: hod-pos033a.tif (example only)
- Save as: TIFF
- Compression: None
- Pixel Order: Interleaved (RGBRGB)
- Byte Order: IBM PC
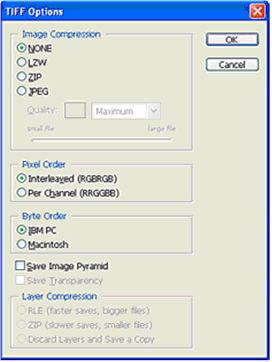
- Optional: Verify the IPTC headers: title/caption, department, keywords, description: File > File Info > IPTC Contact, etc.
Quality Control
Quality control should play a prominent role in scanning operations. Use a file viewer such as Adobe Bridge to examine the thumbnails of every file. Examine no less than 10% of the images in full-image view. Look for proper alignment, orientation, cropping and tone. Correct them or rescan as necessary.
Resources:
- "Image Database and Cataloging Software" (controlled vocabulary)
http://www.controlledvocabulary.com/imagedatabases/programs.html (accessed October 1, 2013)
- Moving Theory into Practice - Digital Imaging Tutorial (Cornell University)
www.library.cornell.edu/preservation/tutorial/contents.html (accessed October 1, 2013)
- Digital Imaging Best Practices, Version 2.0, June 2008 (BCR's CDP)
www.lyrasis.org/LYRASIS%20Digital/Documents/Digital%20Toolbox/digital%20imaging%20bp.pdf
see "Digital Imaging, V2" link on page Best Practices and Publications (Lyrasis) (accessed October 1, 2013)
Appendix: EXTRA MATERIAL
Calculating Resolution of Camera Shots (mostly for Print Purposes)
"Resolution" is the number of pixels a digital image contains. It involved three aspects: height, width and ppi (pixels per inch).
The resolution of a digital image created by a digital camera can be expressed as follows: an image shot at 4 MP (megapixels) has a resolution of approximately 4,000,000 pixels and is 2454 pixels wide and 1636 pixels high, which translates to a screen size of 34" x 22".
Example image resolutions for digital cameras are shown below:
2 MP = 1734 x 1156
3 MP = 2124 x 1416
4 MP = 2454 x 1636
6 MP = 3000 x 2000
7.5 MP = 3354 x 2236
8 MP = 3462 x 2308
12 MP = 4242 x 2828
16 MP = 4902 x 3268
Since most print publishers request images at 300 dpi an image to be printed at 5.5" x 8.5" would require a 4 MP camera shot.
Image Size: 5.5" x 8.5" (half page) would require 4 MP
Image Size: 8.5" x 11" (full page) would require 8 MP
Image Size: 11" x 17" (spread) would require 16 MP
(Charts and figures from: DISC "Guidelines & Specifications", May 2007 (IDEAlliance) - http://www.idealliance.org/sites/default/files/DISCSPECIFICATIONS2007_0.pdf)
(Reviewed: October 1, 2013)